Posts

Workshops in Bath and Bradford on Avon!

We are so excited to announce our new collaboration with JULIA DAVEY And CASSIA COLLECTIVE in Bath and Bradford on Avon!
Make a Merchant & Mills garment in a day with help from professional seamstress and dressmaking tutor Anna Vickery. Suitable for all levels of sewers, you will learn as you go with everything from measuring, laying out and cutting to constructing, altering and finishing your garment. This event is being held at both Cassias (different dates).

All bookings for these workshops should be made through eventbrite, and not through millie moon.   Please click on the link below for each location


About this event

Make a garment from a Merchant and Mills sewing pattern in day with help from professional seamstress and dressmaking tutor Anna Vickery.

Learn as you go, everything from measuring, laying out and cutting to constructing, altering and finishing your garment. Suitable for beginner and progressing dressmakers, please be confident using your sewing machine.

Choose a Merchant and Mills pattern (included) and bring your own fabric, notions, sewing machine and tools (Anna can be contacted with any questions) patterns are supplied via Millie Moon shop in Frome, we also suggest checking out their fabric selection.

Work at your own pace in a small group and let Anna guide you through the process with lots of helpful tips and advice along the way.

(*If you want to finish your garment we suggest choosing a beginner/intermediate pattern, such as The Dress Shirt, The Camber Set, The Trapeze, The Fielder, The Hattie and Ellis or The 101 Trousers, but all are available, www.milliemoonshop.co.uk)

BRADFORD ON AVON 

Saturday 23rd July 2022

Cassia Bradford on Avon

Kingston Road

Bradford on Avon

BA15 1AB

10-3pm

£75*

Book this event here 

*this does not include fabric and notions. You are welcome to purchase these from Millie Moon with a 10% discount. 


BATH

Saturday 13th August 2022

Cassia – Bath Riverside

Sovereign Point

Bath

BA2 3GJ

10-3pm

£75*

Book this event here 

*this does not include fabric and notions. You are welcome to purchase these from Millie Moon with a 10% discount. 


Say hi to Anna our Dressmaking tutor

This weeks blog post is all about our dressmaking tutor Anna Vickery…

I studied Fashion Design at The University of the West of England in Bristol, and graduated with a Ba(hons) in 2005. During my time at university I was selected to exhibit at Graduate Fashion week in London and at The RWA in Bristol. My degree covered many areas including design, pattern cutting and sample development, garment construction, illustration, technical drawing, styling, business, visual culture and contextual studies. I was really lucky that at the time the course covered lots of technical stuff, which now put together with 12 years industry experience I am pleased to pass on what I can to Millie Moon workshoppers.

After university I started my career as a Junior Designer for a specialist company which design and produce heavy duty leather and textile products, mainly for the Police and Armed Forces. It was very much ‘in at the deep end’ but great experience – if I could work with leather on heavy machinery I can sew anything….
Along the way I have also worked for a luxury leather brand and a floral designer – I always seem to pick nice/tempting products to work with, including being at Millie Moon, trying to resist new fabric every week!

I also currently work with amazing Womenswear and Bridal designer Alexandra King. I met Alexandra at university and now help her create handmade clothing and accessories for women worldwide from her Wells shop and studio. We design and make every garment, mostly dresses, in house and strongly believe in traditional craftsmanship and service. I am mainly involved with the actual making of the dresses, it may surprise you to know that despite my background in ‘design’ I hate drawing, so we work well together – Alexandra is an inspiration. www.alexandra-king.com


Since school/college/university and beyond my influences have come from twentieth century art, media and design. We’ve had a crazy busy year for wedding dresses, so my personal projects have taken a bit of a hit, but I’ve recently made a few tops from the new jersey and lace fabrics from Millie Moon, given my spare room a little make over with a new lampshade and cushions and I’ve got one of the new Merchant and Mills patterns ready and waiting for the perfect material.


I’ve been leading workshops for Millie Moon for 5 years now, where does the time go! – it’s great to be able to share skills in such a colourful and creative environment, plus I absolutely love coming over to Frome. My workshops mainly run on Tuesdays, coming up in the next few weeks I’ve got baby bloomers, peter pan collars, kids dungaree dress making and garter making. My 6 week dressmaking evening class is always popular and I’ve met some great people over the years, I’ve also just launched a 4 week dressmaking ‘master class’ which will run again later in the summer.

I am happy to offer 1-1 sewing/dressmaking tuition, how to get the most from your Overlocker sessions and I’ve also been known to help out with the odd Hen party.

For more information about Annas next workshops email us info@milliemoonshop.co.uk or take a look on the website  or you can follow Anna on Facebook and twitter

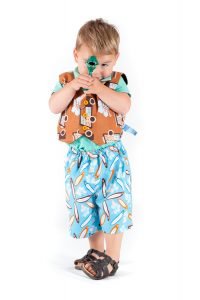
Anna has aslo designed her own range of children clothes patterns. Tested and tried in the workshops, these patterns are great for all sewers. Patterns range from ages 1-5 or 3-12 years. All available in store and on the website.

Anna chats about working with the new lace and jersey fabric

Hello! I’m back from holiday (we were very lucky with the weather, I’m glad it wasn’t this week!) and as promised here’s a little more about making my new t shirts from the lace and jersey materials…

.

I didn’t use paper patterns for the t shirts, instead I made patterns from t shirts I have and like – making your own patterns in this way is surprisingly easy, especially with stretch materials/looser fits which require little or no shaping, they are basically just 2 pieces – a front and a back! Just lay the garments out flat and draw around onto dressmakers tracing paper, adding seam allowances at the sides, shoulders and where needed for hems/necklines.


The main seams on the jersey t shirt were put together on my overlocker, using 4 threads/2 needles – overlockers are the best for sewing stretch, although you can do it without one by using a small zig zag stitch. I overlocked and turned the sleeve and waist hems, topstitching on my regular sewing machine, with a ballpoint needle of course! My machine doesn’t really like using twin needles so I didn’t push my luck, but if yours does this would be ideal. I made matching jersey binding for the neckline – did you know stretch binding doesn’t have to be cut on the bias? The jersey handled really well, it does tend to stretch out a little as you work with it and you have to be careful not to pull it out of shape, but I was pleased with how it springs back into shape if you steam as you go along.


The Lace t shirt is based on a cream one I’ve worn loads, it’s unlined and you wear a vest top underneath. To make it neat as it’s sheer I french seamed the shoulder and side seams. For the hem I trimmed around the edge of a scallop in the lace – this is some thing I often do with bridal dresses, it’s a bit fiddly cutting along the motif and you have to test to check it will not unravel, but it gives a lovely delicate finish and shows off the lace. I also did something similar for the sleeve and neck bindings, which I machined on and then hand stitched along the motif edges so there is no topstitching showing.

The t shirts were quick and easy to make and have washed well, I’m particularly impressed with the jersey as it is a really nice in between weight and isn’t at all see through. Next up I’ve got some of the lace in yellow ready to make a skirt, although I think Becki has beaten me to it…..


Anna x

Millie Moon Makes – Free Tutorials – Make a simple net petticoat

This is a free patternless tutorial for a net petticoat with an elasticated waist, perfect to be worn under the new Anna Vickery Sewing Patterns For Children’s Clothing Childs Rock n Roll dress, or Childs Party Dress.
Materials:
15cm cotton fabric (115cm wide)
1m25cm of dress net (150cm wide)
50cm of ½” wide elastic
Matching thread
Sewing machine/iron
Pins/safety pin
Cutting board/metal ruler/tape measure
Scissors/tailors chalk/rotary cutter

Step 1: Cut – With the width of the fabric folded in half, cut a 15cm long strip from the cotton fabric for the waistband and 4 equal lengths of dress net (see table below for net lengths.) A cutting board with metric markings, metal ruler and rotary cutter make this quick and easy, but if you don’t have them this can be done with a ruler, chalk and scissors.
Net Lengths:
Age 1-2 = 24.5cm x4
Age 2-3 = 26cm x4
Age 3-4 = 27cm x4
Age 4-5 = 28cm x4
*If you use these lengths the petticoat will not show under the dress – if you want the hem of the petticoat to show make the net lengths longer*

Step 2: Press folds in waistband – While to waistband is flat press a double fold using an iron of 1cm, then 3cm at the top for the elastic and 1cm, then another 1cm at the bottom for the hem.

Step 3: Back seam – Because the back seam edges of the waistband are the ‘selvedge’ edges of the fabric they do not need finishing (handy!) Open out the pressed folds at the ends of the waistband and join the ends with right sides together, pin and sew using a 2cm seam allowance. Press the back seam open and the folds back in place.

Step 4: Stitch waistband – Machine stitch around the folds on the waistband. Stitch close (3-5mm) to the inside folded edges. Leave a gap in the stitching of 2cm on the top section for the elastic to go through.

Step 5: Attach net – I find it useful to mark the waistband into quarters with pins so I know what space each 150cm long piece of net has to fit into. Machine sew the net straight onto the waistband hem in a single layer, gathering up the net by hand as you go along, the edge of the net should be about 1cm above the hem on the right side and the stitch line should be in the same place as on the hem. When you get to the next waistband quarter/150cm piece of net overlap the net pieces by 5cm so you can’t see the join.

Step 6: Insert elastic in waistband – Attach 1 end of the elastic to a large safety pin and pin the other end to the waistband near the 2cm gap in the stitching. Slide the safety pin into the top fold and pull the elastic through the channel, gathering up the waistband cotton fabric as the elastic works along. Once the safety pin reaches the gap in the stitching again pull it out, adjust the elastic to fit the childs waist measurement, knot the elastic ends together, trim off any excess and sew the gap closed.


Step 7: Decorate – Trim the petticoat with ribbon, lace, ric-rack or bobble trim. You could also add bows or ribbon roses, the petticoat will be so pretty it could be worn on its own with leggings or under a handmade dress made from an Anna Vickery pattern.